Submit your app for review
Learn about the app submission process and how to submit your app for review to be considered for inclusion in Klaviyo’s App Marketplace.
Before you begin
Before you begin, you should review Klaviyo’s app listing requirements to ensure you qualify to be listed and that your submission process goes as smoothly as possible.
One of our requirements before submission is to have at least 5 active installs of your app. To meet this requirement, once you have set up OAuth for your app, share the installation URL you created to invite customers to install and start using your app.
You will learn
In this article, you’ll learn about our app submission process and submit your app to Klaviyo’s App Marketplace. You’ll complete the following steps before submission:
- Confirm authentication information for your app
- Tell us about your company
- Provide app listing information for users
- Submit our registration and security forms
You’ll also learn what to expect post-submission and how to update your app once it’s published:
Submit your app to Klaviyo's App Marketplace
Once your OAuth app has 5 or more installs with API activity, you have the option to submit your app to Klaviyo’s App Marketplace, which requires a formal review. Until your app has been reviewed and approved by our team, users will receive an OAuth installation warning that your app has not been reviewed by Klaviyo. While customers and testers can still install and use your app, having your app approved by Klaviyo will remove this warning and allow for easy discoverability within the App Marketplace.

Note that not all submitted apps will be approved. Klaviyo reserves the right to not list your app for any reason. Be sure to read and follow our app listing requirements thoroughly to expedite your review process.
To get started, navigate to our app management page. Click the 3 dots next to your app, then select Edit. Next, ensure that all of the required fields requested under Authentication, Company details, and Listing details (explained below) have been completed and contain correct information.
Confirm authentication information for your app
In the Authentication tab, you'll be asked to complete the following items:
1. Define scopes requested by your app
Under OAuth information, ensure that you have listed only the necessary scopes needed to use your app using a space-separated list as shown below (accounts:read is required by default and must remain in this list).

You must use the least permissive scope set possible in compliance with our app listing requirements. If your app requests more scope permissions than necessary, it will be rejected.
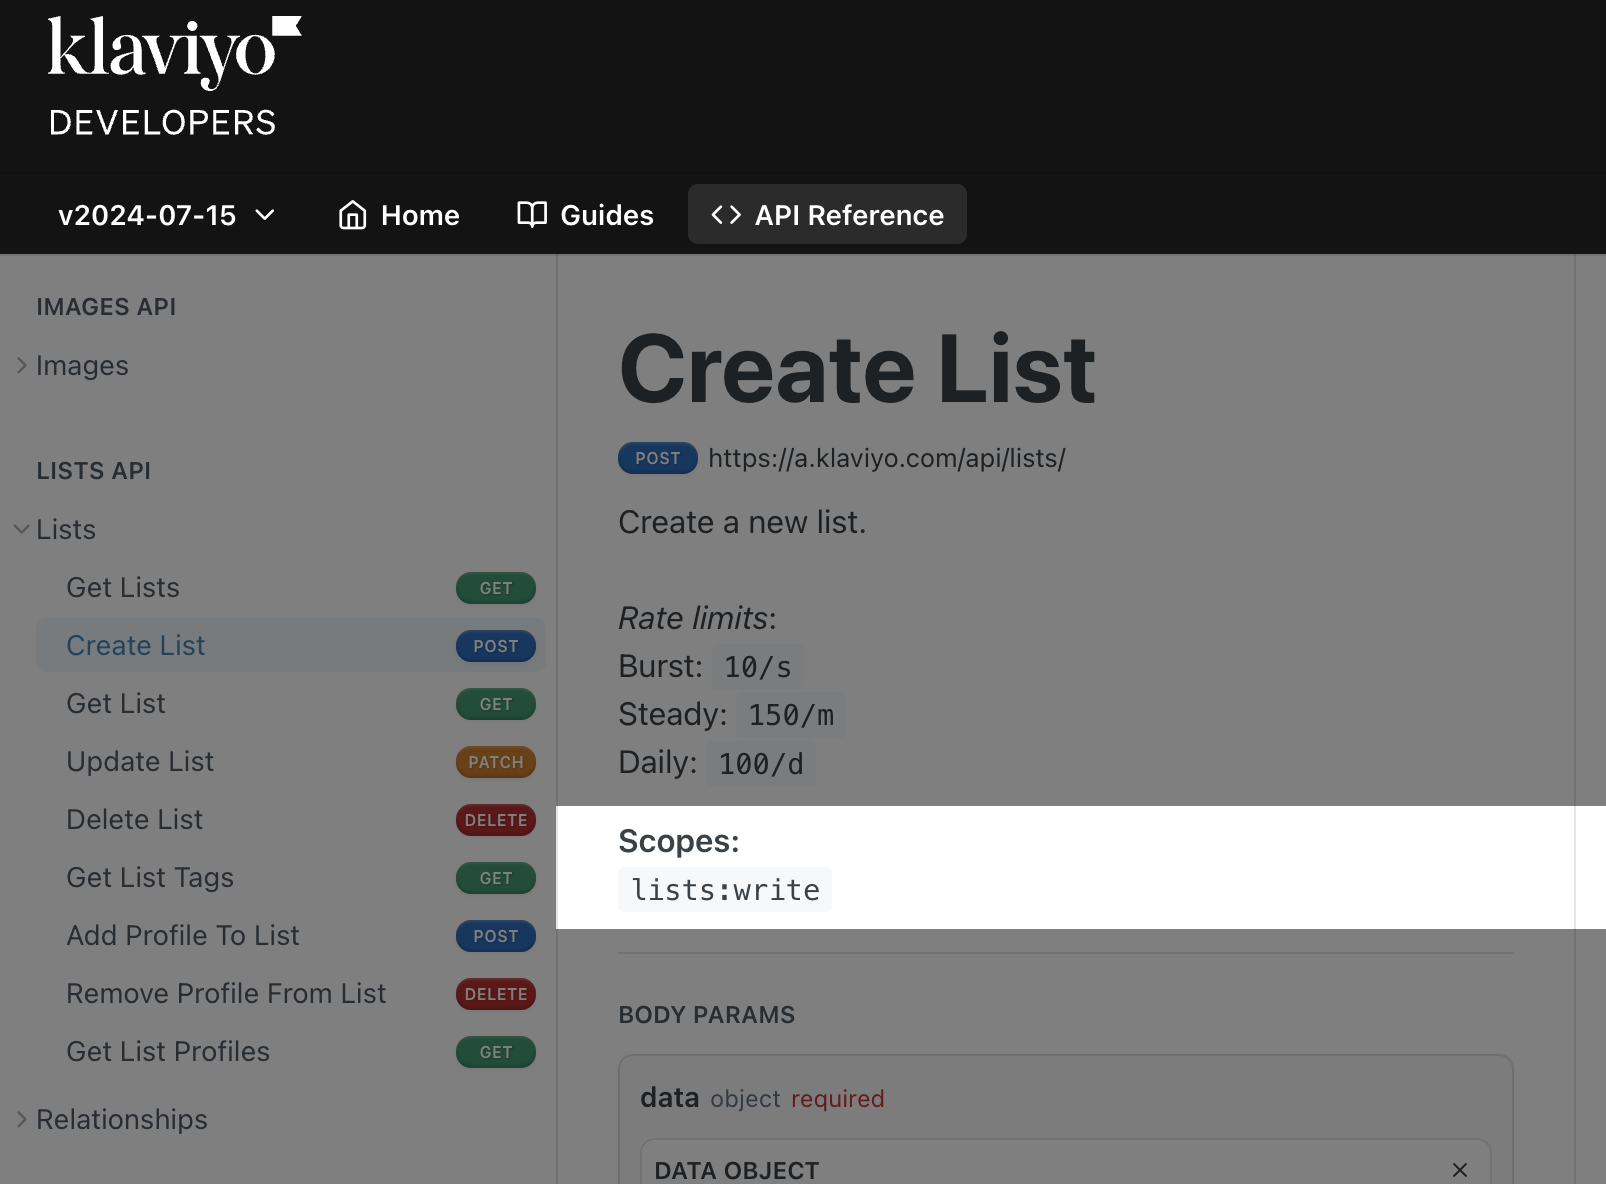
For each endpoint your app calls, view its corresponding API reference documentation to understand which scopes you’ll need to define. The scopes your app requests must match your app’s use cases. For example, if your app calls the Create List endpoint, your app needs the lists:write scope as shown in the following API reference documentation for the Create List endpoint:

| Example: Your app calls Query Campaign Values and Query Flow Values endpoints within the Reporting API to access existing campaign and flow performance data. Access to any related resources to campaigns and flows is not required for your app's functionality. | |
|---|---|
Do:
|
Don't:
|
2. Edit and/or add redirect URLs
Edit and/or add redirect URLs which are used for OAuth validation. For more than one redirect URL, separate each with a space, tab, or enter.

When you have finished setting your scopes and redirect URLs, click Save in the top right to save your changes.
3. Provide testing instructions for your app
The testing instructions you submit for your app must be an adapted copy of our Klaviyo App & Testing Requirements template. Links to public-facing documentation will not be accepted.
In the Testing instructions section, provide a URL to a Google Doc with “Commenter” access enabled. This document must contain clear and detailed instructions for us to fully test your OAuth installation flow and use cases. Be sure your testing instructions address the following:
- If your app is not free to install, include detailed steps for how we can get access to an account for testing your app or provide us access with your submission.
- Ensure the testing instructions include the app testing information detailed in Klaviyo's app listing requirements.
- Use the provided template as a framework to ensure all necessary details are included.
When you have provided your URL with your complete testing instructions, be sure to click Save in the top right to save your changes.
Do not share any account credentials with us in your submission or via email. To provide third party account access (required for testing), you may add the [email protected] email to your test account, or submit a password reset to that account.
Tell us about your company
It’s important that our review team has key information about your company, including business activities, background, and contact information. In the Company details tab, you’ll be asked to complete the following items:
1. Fill out your company information
In the Company information tab, fill out your company details, including your company name, description, and a URL to your company’s website. We ask that your description is concise, yet provides a comprehensive overview of your company’s main business activities and background. When you have finished, click Save in the top right of the Company information section.
2. Provide contact information to receive updates
We’ll need contact information so that our team can provide updates and request any necessary changes during your app’s review process. In the Contact information section, provide at least one email address so that our team can contact you regarding your app’s review. You may provide more than one email address; separate each email address with a space or enter. When you have finished, click Save in the top right of the Contact information section.
Provide app listing information for users
To ensure that your app’s review is successful, you must provide app listing details that help users understand your app’s capabilities and get started using your app. The descriptions and details you provide in the Information section (under App listing) will be used to populate your app listing and display it to target market segments. Under the App listing tab, complete the following items:
1. Describe your app
In the Information section, provide the following information which will be displayed on your app’s listing:
| App listing information | Description |
|---|---|
| Developer name | The name of your app’s developer (<= 30 characters). Typically, this is your company’s name. |
| Primary category | The single category that your app is tagged with for searchability. See our Available App Marketplace categories below to pinpoint which category best describes your app. |
| Short description | The preview text (<= 75 characters) that is shown when a user searches for an app in the App Marketplace. |
| Full description | A detailed description of your app (<= 300 characters) that details what your app does and why someone should use it. |
The Information section also requests for target market segments, i.e., any applicable target market segments you would like your app to reach. This information is not shown on your app listing, but it is used to display your integration to a specific group of clients that your app targets.
2. Provide URLs for installing and using your app
In addition to the app listing descriptions above, you must also provide the following URLs for installing and using your app:
OAuth installation URL
The OAuth installation URL initiates the OAuth installation flow for the account. This is where users will be directed to begin the installation process of your app after they click Install on your app’s listing page. Follow the guidelines below to ensure that your OAuth installation URL meets our requirements:
Do:
|
Don't:
|
Note that your OAuth installation URL should correctly point to your app’s OAuth setup page and be installable from both the Klaviyo side and your app side. Make sure you have detailed this in your testing instructions so that our team can test your app’s installation flow.
Settings URL
The Settings URL directs users to an area where they can interact with Klaviyo-specific app settings.
Pricing and support URLs
Provide a Pricing information URL to direct users to your app's pricing information. It will appear on your app listing as Learn more about pricing.
For customer support, you'll also provide the following URLs, which will appear under Support on your app listing:
| URL | Description |
|---|---|
| Website URL | The URL to direct users to your app’s website. Appears on your app listing as Visit website. |
| Privacy policy URL | The URL that directs users to your app’s privacy policy. Appears on your app listing as Privacy policy. |
| Support team email | An email or URL to allow users to contact your support team. Appears on your app listing as Contact support. |
3. Detail key features of your app
Complete the Features section with titles (<= 65 characters) and descriptions (<= 225 characters) for 2-6 key features that showcase exciting features of your app. Click Save on the top right of each feature to save your changes.
4. Add help articles for your app
Your app listing can feature up to four articles, categorized as either user guides or case studies. In the Articles section, you must provide at least one user guide to assist users with app setup and usage. Click Save on the top right of each article to save your changes.
5. Upload your app logo
The file you submit for your app's logo must be a basic SVG file without any scripting.
In the Logo section, upload a logo (48x48) for your app. This image will be used on your app listing page and throughout the Klaviyo app. Click Save at the top right to save your changes.
6. Upload images for your app's media gallery
Under Media gallery, select one of two gallery types, Multi-media and Cover image. A Multi-media gallery requires you to upload 4-8 images and optionally include a video. A Cover image is a single image for your app listing. We recommend Multi-media to best showcase your app.
7. Preview your app listing
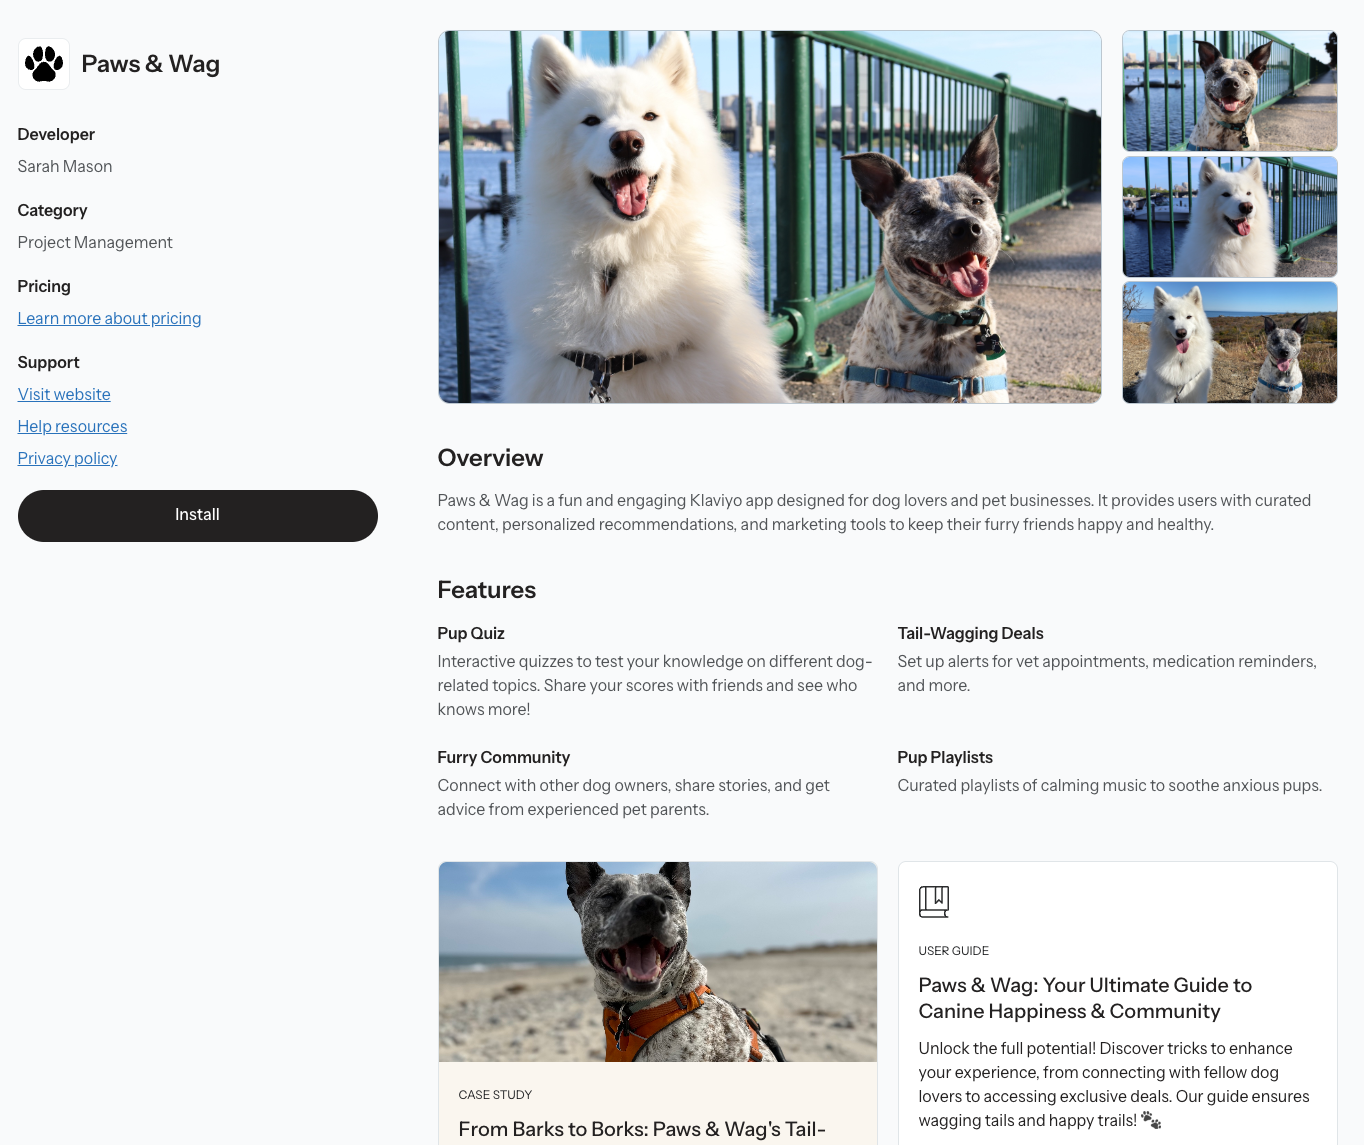
Once you have completed adding your listing details and have saved your changes, click Preview listing in the top right to preview your app listing. We recommend previewing your listing as you save and edit different sections of content within the App listing tab. Your listing should look something like this:

Submit our registration and security forms
Before you submit your app for review, you must complete our required registration and security forms with the Registration & security tab. If you submit your application without submitting these forms, your app will be rejected.
1. Register your integration
In the Integration registration form section, click Open in the top right to open and fill out our integration registration form. It is required to register your integration and accept our terms before you submit your app. Note that your company only needs to submit this form once.
2. Submit our security form
The security form must be submitted for each unique app your company submits.
In the Security form section, click Open in the top right to open and fill out our security form which is required for your app to be considered for our App Marketplace. Information on your company, app, and use case(s) must be true and complete at the time of submission (see Klaviyo’s app listing guidelines).
The Insights tab provides valuable data about your app's API usage, including recent API activity and logs. It also highlights endpoints with the highest error rates over the last 24 hours, along with error details and suggested fixes. You can monitor your app at any time from the Integrations tab.
Available App Marketplace categories
Use the table below to select a category that best fits your app (App listing > Information).
| App Marketplace category | Definition |
|---|---|
| Advertising | Tools for managing and steering online advertising campaigns such as social media platforms, search engines, and marketplaces. |
| Advanced KDP | Refers to Advanced Klaviyo Data Platform which is software that collects and unifies customer data, linking it from many sources to build unified customer profiles. |
| CRM | Refers to Customer Relationship Management systems (Salesforce CRM, Netsuite, etc.). |
| Data warehouse | Data management systems designed for data analytics and/or business intelligence activities. In Klaviyo, these are available to Advanced KDP customers only. |
| Design & content | Design applications that aid in enhancing Klaviyo content. |
| Direct mail | Form of advertising in which physical mail pieces (letters, postcards, brochures, catalogs, etc.) are sent directly to potential customers. |
| eCommerce platform | Software that enables the commercial process of buying and selling on the internet (e.g., finding a specific product, adding to cart, and completing a purchase). It is assumed that all merchants in the eCommerce industry that are using Klaviyo have at least 1 eCommerce integration. |
| Email service provider | Integrations for helping users transfer their previous profiles, opens/clicks, etc. into Klaviyo. |
| Event management | Software that streamlines the planning, organization, and execution of events. Typically, event registration, ticketing, and post-event management occurs within this software. |
| Fundraising | Software designed to help companies optimize their virtual fundraising efforts, recruit donors, and raise funds. |
| Health and wellness | Scheduling and business management software for wellness services. |
| Journey optimization | Provide tools and services for tracking, analyzing, and interpreting data related to customer interactions, website traffic, and sales performance. |
| Landing pages and forms | Web page, popup, or modal where users enter information with intent to engage with the merchant's organization. |
| Payments | Platform that enables customers to accept payments across credit cards, debit cards, cryptocurrency, etc. |
| Personalization | Enriches Klaviyo with data for personalized content (e.g., product recommendations) and/or onsite user interactions. |
| POS | Refers to Point of Sale systems (e.g., Lightspeed or Square POS). |
| Quizzes & surveys | Applications designed to create, distribute, and analyze quizzes and surveys efficiently. |
| Restaurant | Restaurant management software. |
| Reviews | User-generated feedback of products or services, typically accompanied by ratings and written comments. |
| Rewards & loyalty | Management systems that encourage customers to purchase, engage with, or use products and/or services of a specific brand. Customers are recognized and rewarded for purchasing products and/or interacting with the brand via other means. |
| Shipping | Shipment tracking tools designed to manage the shipment and return of products and keep customers updated on order status. |
| Subscriptions | Enables businesses to offer products or services on a recurring basis, typically through subscription models. |
| Support & help desk | Software that enables customer support to track user requests and manage customer-care related issues. This includes coordination with customers via SMS conversations. |
| Workflow automation | Connects various software applications and services together, enabling data transfer, automation, and synchronization between them. Provides tools and interfaces for creating workflows, automating tasks, and managing data flows. |
Review and submit your app
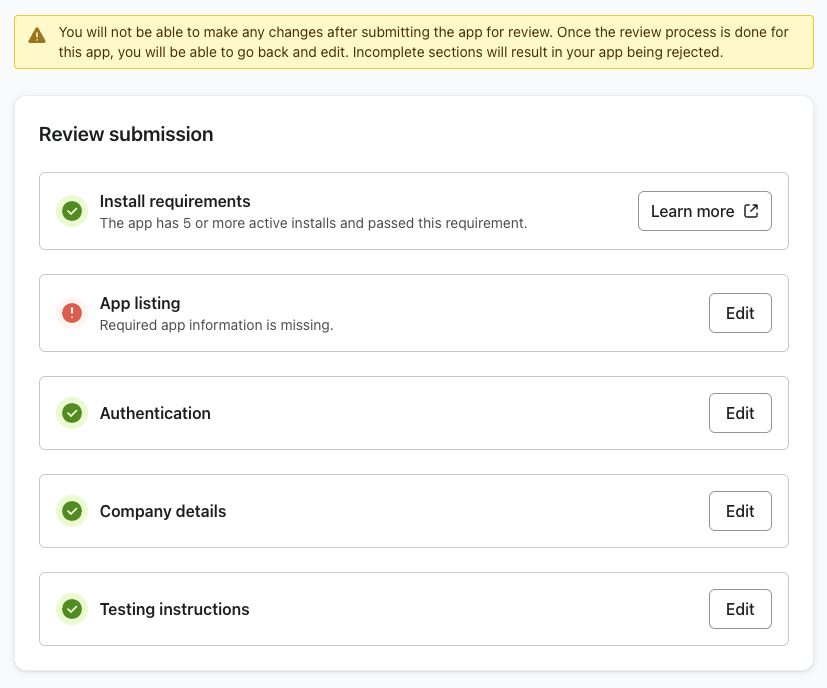
Once you have completed each section for your app submission, it’s time to review and submit your application:
- Click Review submission. You should see a list of the sections you completed with icons indicating their statuses.

- Ensure that each section has been completed and click Edit on any section that you would like to update with complete, correct information.
- When you’ve finalized your submission, click Submit. You will see a Submitted for review message confirming that your submission has been successfully sent and is pending review.
What to expect after submitting your app
Once you’ve submitted your application, our team will review your submission and follow up via email if the app has been approved, rejected, or requires additional changes before approval. In your email service provider’s settings, add [email protected] to your allowed senders list to ensure that you receive important updates on your submission.
Review process
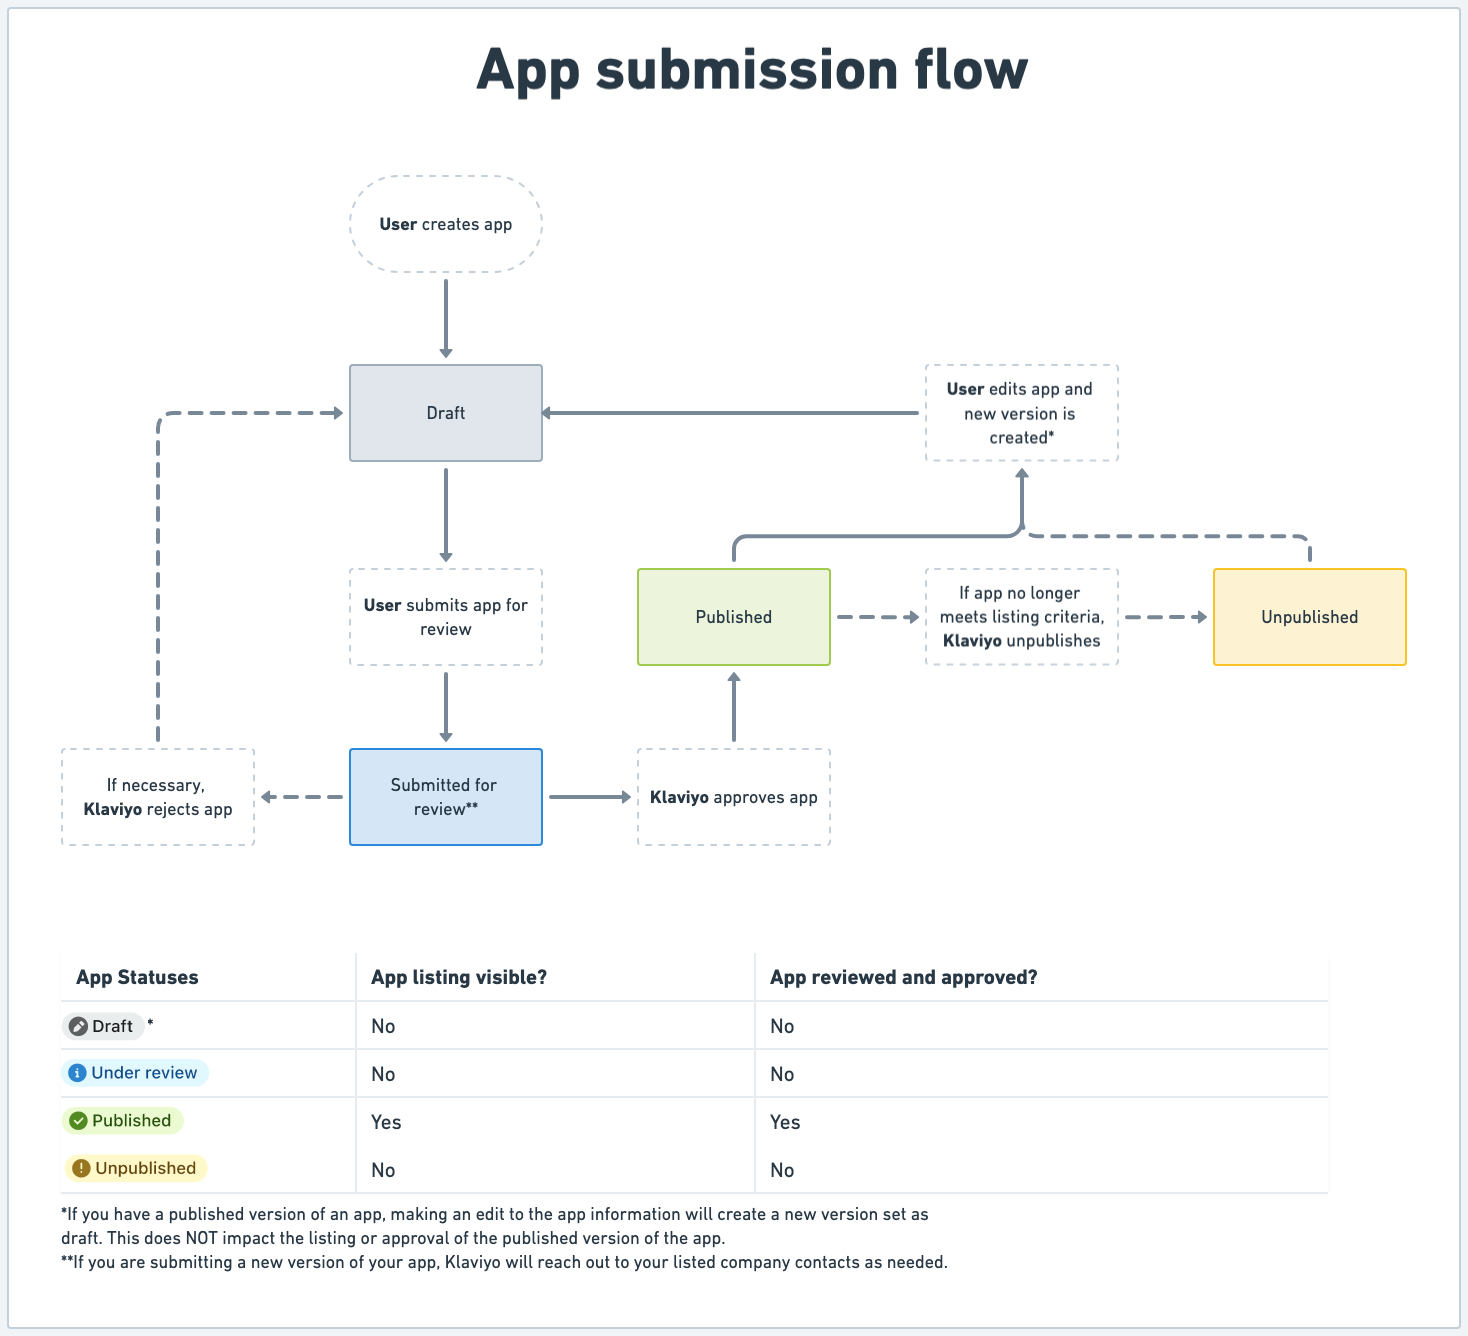
Your in-progress app will be in one of the following states: Draft, Submitted for review, Published, or Unpublished. You can view your app’s status on the Manage apps page.

Update your published app
If you’d like to make changes to your app, such as your app’s listing, you’ll have to resubmit your app for review. For changing scopes or redirect URLs, refer to our guide on updating OAuth scopes to learn how to update your app's authorization request flow and handle authorization-related errors effectively. Changes will not be published until your app has been re-reviewed and approved. Once approved, a new version of your app will be created and published.
- Navigate to Manage apps.
- Click Edit on the Published app you would like to update.
- Apply edits to your submission and click Review submission. Ensure that the correct information has been updated, then, click Submit.
If your app uses private key authentication, you'll need to update your app to OAuth by June 30th, 2025 to unlock the benefits of our new K:Partners program and stay listed. Failure to update may cause service disruptions and potential de-listing of your app.
Additional resources
Updated 7 months ago