Sync a custom catalog feed to Klaviyo
Learn how to sync a custom catalog feed to Klaviyo.
If your catalog feed is not synced by one of our pre-built ecommerce integrations, or you have catalog information stored in another system, you can use Klaviyo's custom catalog sync feature or our catalogs API to bring your catalog into Klaviyo. Then, you can use items from that catalog feed to populate emails.
Choosing between catalog feeds and the Catalogs API
Use the following table to decide between using catalog feeds and the Catalogs API.
| Catalog feed | API | |
|---|---|---|
| Setup | Straightforward setup directly from Klaviyo's UI | Create categories, items, and variants via API |
| Variant support | No native variant support; track variants as separate items in a feed | Native variant support |
| Update frequency | Every 6 hours | Real-time, with the ability to push items |
| Size limit | 100 MB | No size limitations |
Custom catalogs support a single sync method
If you are using a JSON/XML custom catalog synced via the method detailed in this guide, note that you cannot use the Catalogs API to make delta updates. When working with custom catalogs, you must select a single method. However, you can use both a custom catalog as outlined below and a catalog synced via a native Klaviyo integration.
This guide will walk you through the requirements for your custom catalog feed and how to sync your custom catalog feed to Klaviyo. You can also check out our YouTube tutorial on setting up a custom catalog in Klaviyo, which covers both syncing a custom catalog feed and using the Catalogs API. Once your feed has been built and synced to your Klaviyo account, you will be able to use Klaviyo’s product recommendation, product block, and catalog lookup tag features. Klaviyo resyncs the information from a given catalog feed source every six hours.
For free accounts
As discussed below, in order to finalize your catalog feed (and, in order to sync your catalog feed if it has more than 1 million items), you must contact Klaviyo's customer support team. If you are using Klaviyo's free plan, you have 60 days of dedicated email support after account creation during which you can submit a request. After the 60 day period, you must upgrade your account to submit further requests.
Using custom catalog content
The custom catalog feature can be used to leverage product feeds and easily insert hand-picked catalog items in an email, as well as Klaviyo-generated personalized product recommendations. To learn how, check out Use custom catalog data in emails. Your custom catalog source can contain anything that you would consider to be “items” you want to share or recommend to your subscribers, whether these are products, store locations, ticketed events, or blog articles.
Custom catalog requirements
Klaviyo can sync custom catalog feeds that meet the following requirements:
- The catalog is a public, hosted feed of all the items in your catalog.
- If you do not have your own feed hosting location, you can use a service such as Google Merchant feeds.
- The feed is in JSON or XML. Check out an example feed in JSON and an example feed in XML.
- The feed is accessible on an HTTPS URL.
- The data in the feed is only one node deep, not nested JSON or XML (unless it is hosted on Google Merchant Feeds).
- The size of any one feed file should not exceed 100 MB; for optimal performance, we recommend each feed file not exceed 50 MB. If your file exceeds this amount, please split the feed into multiple files. All files used as sources will feed into the same catalog in Klaviyo.
- Required fields must not be left blank. For unavailable numeric fields, pass a zero (0), and for unavailable text fields, pass something indicating this such as “n/a” or “unavailable”.
- If your feed is hosted with a caching layer, disable caching for the location where the feed is hosted or refresh this cache when the feed is updated. Otherwise, Klaviyo will only pull updated data for the feed items after the cache is refreshed.
If your feed will have more than 1 million items, please contact Klaviyo support before you reach the “Add feed to account” step of this setup. This will allow us to pre-allocate necessary resources on our end to better optimize for larger catalog sizes.
Tracking variant items
If your catalog items have variants that you want to appear in email recommendations, you will need to track each variant as a separate item in the feed using either the variant ID of that item or some unique combination of the parent and variant ID. There is currently no way to set up related or variant items in Klaviyo in a traditional parent-child model. Thus, each item must be accessed separately and have a unique ID.
If you want a variant to appear in a dynamic product recommendation, we recommend that you include it in the catalog feed. The metric you select for product recommendations in the product feed setup passes the variant IDs you use as a property on that metric (see How to use product feeds and recommendations).
Mappable catalog properties
You can include any data you want in your custom catalog feed. In addition to the data you choose to include, Klaviyo also has some special mappable properties that unlock certain features of our platform. Below is a list of the required and optional fields available for our default catalog feed setup.
Please note that if you need to add a new field to an existing custom catalog, you'll need to delete the source and then re-add it with the new field.
Required fields
In order for the mapping step of the catalog setup to work, the following required fields must be included for each item in the feed. The name in parentheses is the field that they will map to in Klaviyo:
- Item ID ($id): Can be text, numeric, or alphanumeric, but must be unique.
- Title ($title): The name of the item.
- URL ($link): The URL at which a person can find this item.
- Image URL ($image_link): A URL at which the image for this item is hosted (must use https).
- Description ($description): A text description of the item.
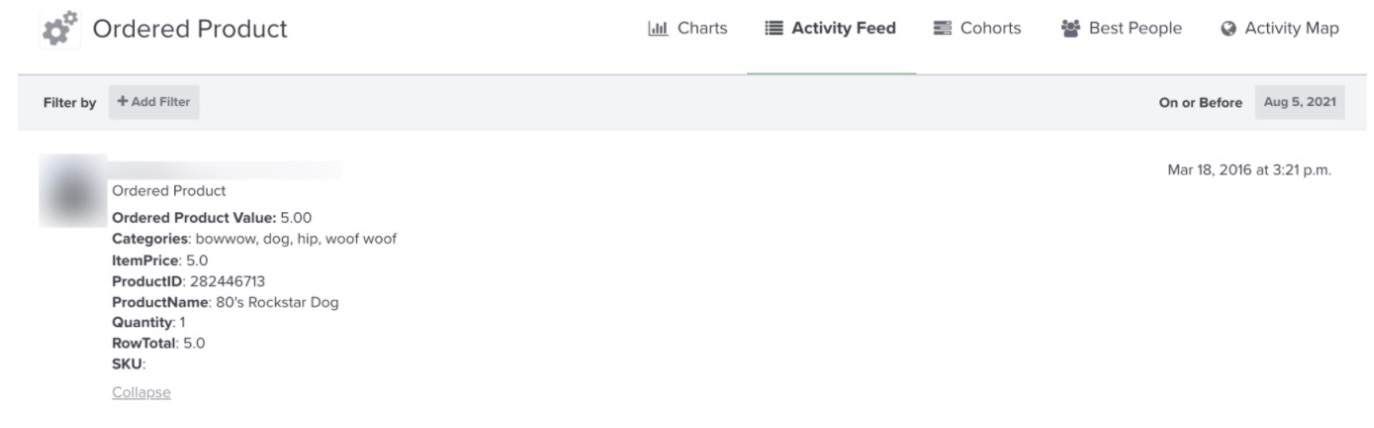
The Item ID ($id) of a product in the catalog feed must match the ProductID of the metric you want to use for personalized recommendations. For example, if you pass an Ordered Product metric to Klaviyo, the value passed as a “ProductID” property must match the Item ID of that product in your catalog feed.
To find the ProductID in an Ordered Product metric, navigate to the Analytics tab in your Klaviyo account and click Metrics. Find the Ordered Product metric in the list or via search, click on it, then click Activity Feed. Here you will find individual metrics. Click on Details for an individual metric to show the full metadata for that metric, including the ProductID.
Optional fields
In addition to the required fields above, we also recommend passing the following optional fields (the name in parentheses is the field that they will map to in Klaviyo):
- Price ($price): The numeric item price, with no currency symbol
- Categories (categories): A comma-separated list/array of categories, tags, or collections
associated with an item
Additionally, there are fields that can be added to enable Back in Stock. Enabling Back in Stock relies on item inventory tracking. Include additional fields for:
- Inventory ($inventory_quantity): a number representing the stock for a given item. Note that this field must also be mapped with data available if you want to use a price drop flow or a low inventory flow in Klaviyo.
You can also include the following optional parameter:
- Inventory Policy ($inventory_policy): a number that controls how Klaviyo treats product visibility in product feeds and blocks. This field has two available options:
- 1: If the policy is set to 1, a product will not appear in dynamic product recommendation feeds and blocks if it is out of inventory quantity
- 2: If the policy is set to 2, a product can appear in dynamic product recommendation feeds and blocks regardless of inventory quantity. This is also the behavior when this field is not set.
Catalog property considerations
As you set up your catalog feed, here are some functionality considerations to keep in mind:
-
When creating a product feed, it is possible to filter your feed by price, inventory, and categories. If there is an attribute, tag or field that you will want to filter your feed by, include it as a category.
- For tags like "size", we recommend using the following format: "key_value" ("size_small").
-
The first item in your feed must contain all available fields (in case some of your items do not). The mapping step of the catalog sync draws on the fields from the first item in the feed, so it is important that all fields are present in order to map successfully. For example, if some of the items in your feed contain eight fields, but some items only contain six of those fields, the first item in the feed should contain all eight fields.
-
Custom fields can only be used in templates in a catalog lookup.
Sync your catalog
Add your feed
Once your feed is set up and hosted at a URL, add it to your account:
-
Navigate to Content > Products in Klaviyo.
-
In the upper right, select Manage Custom Catalog Sources.

-
On the next page, click Add new source.
-
Name your feed source and add the URL. You can optionally add a username and password if access to the feed URL requires them (your feed URL will determine this setting). Then, click Define Source.
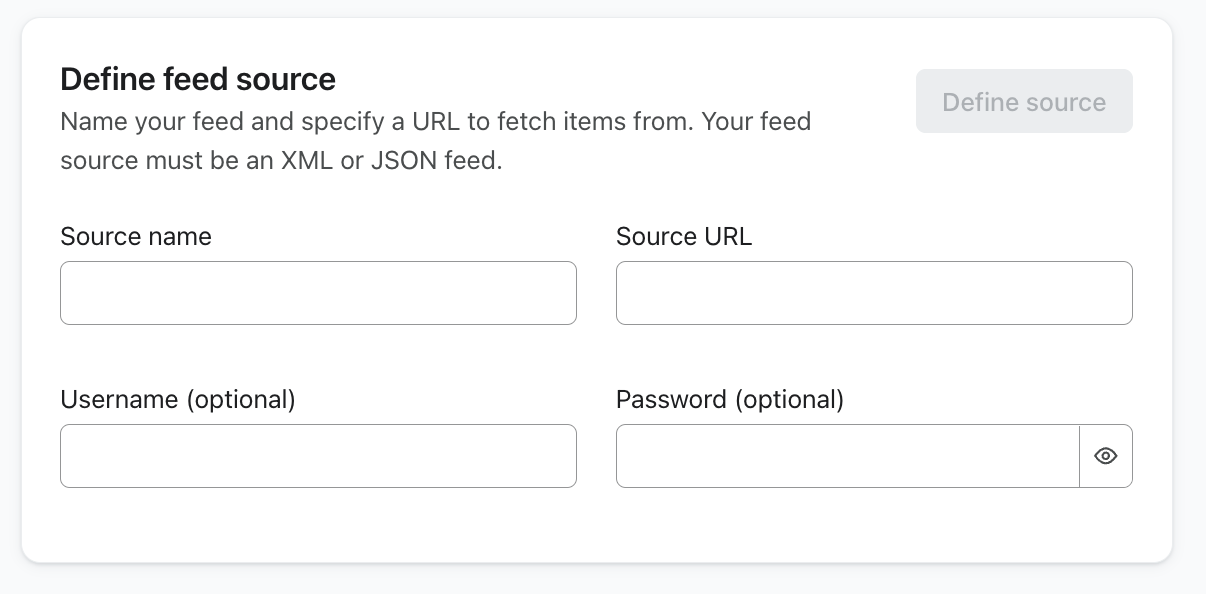
You’ll receive a green success callout showing your source has been added.
Map feed fields
After your feed has been added as a catalog source, you can configure the feed fields mapping. From the Custom Sources page, click Configure field mapping under Status next to the source.
Klaviyo will try to automatically map the fields in your feed based on their name, but if they do not automatically map, you may need to set them yourself. Map price to $price in order to leverage it for product blocks. Using all of the required and optional properties above, your mapping should look like this:
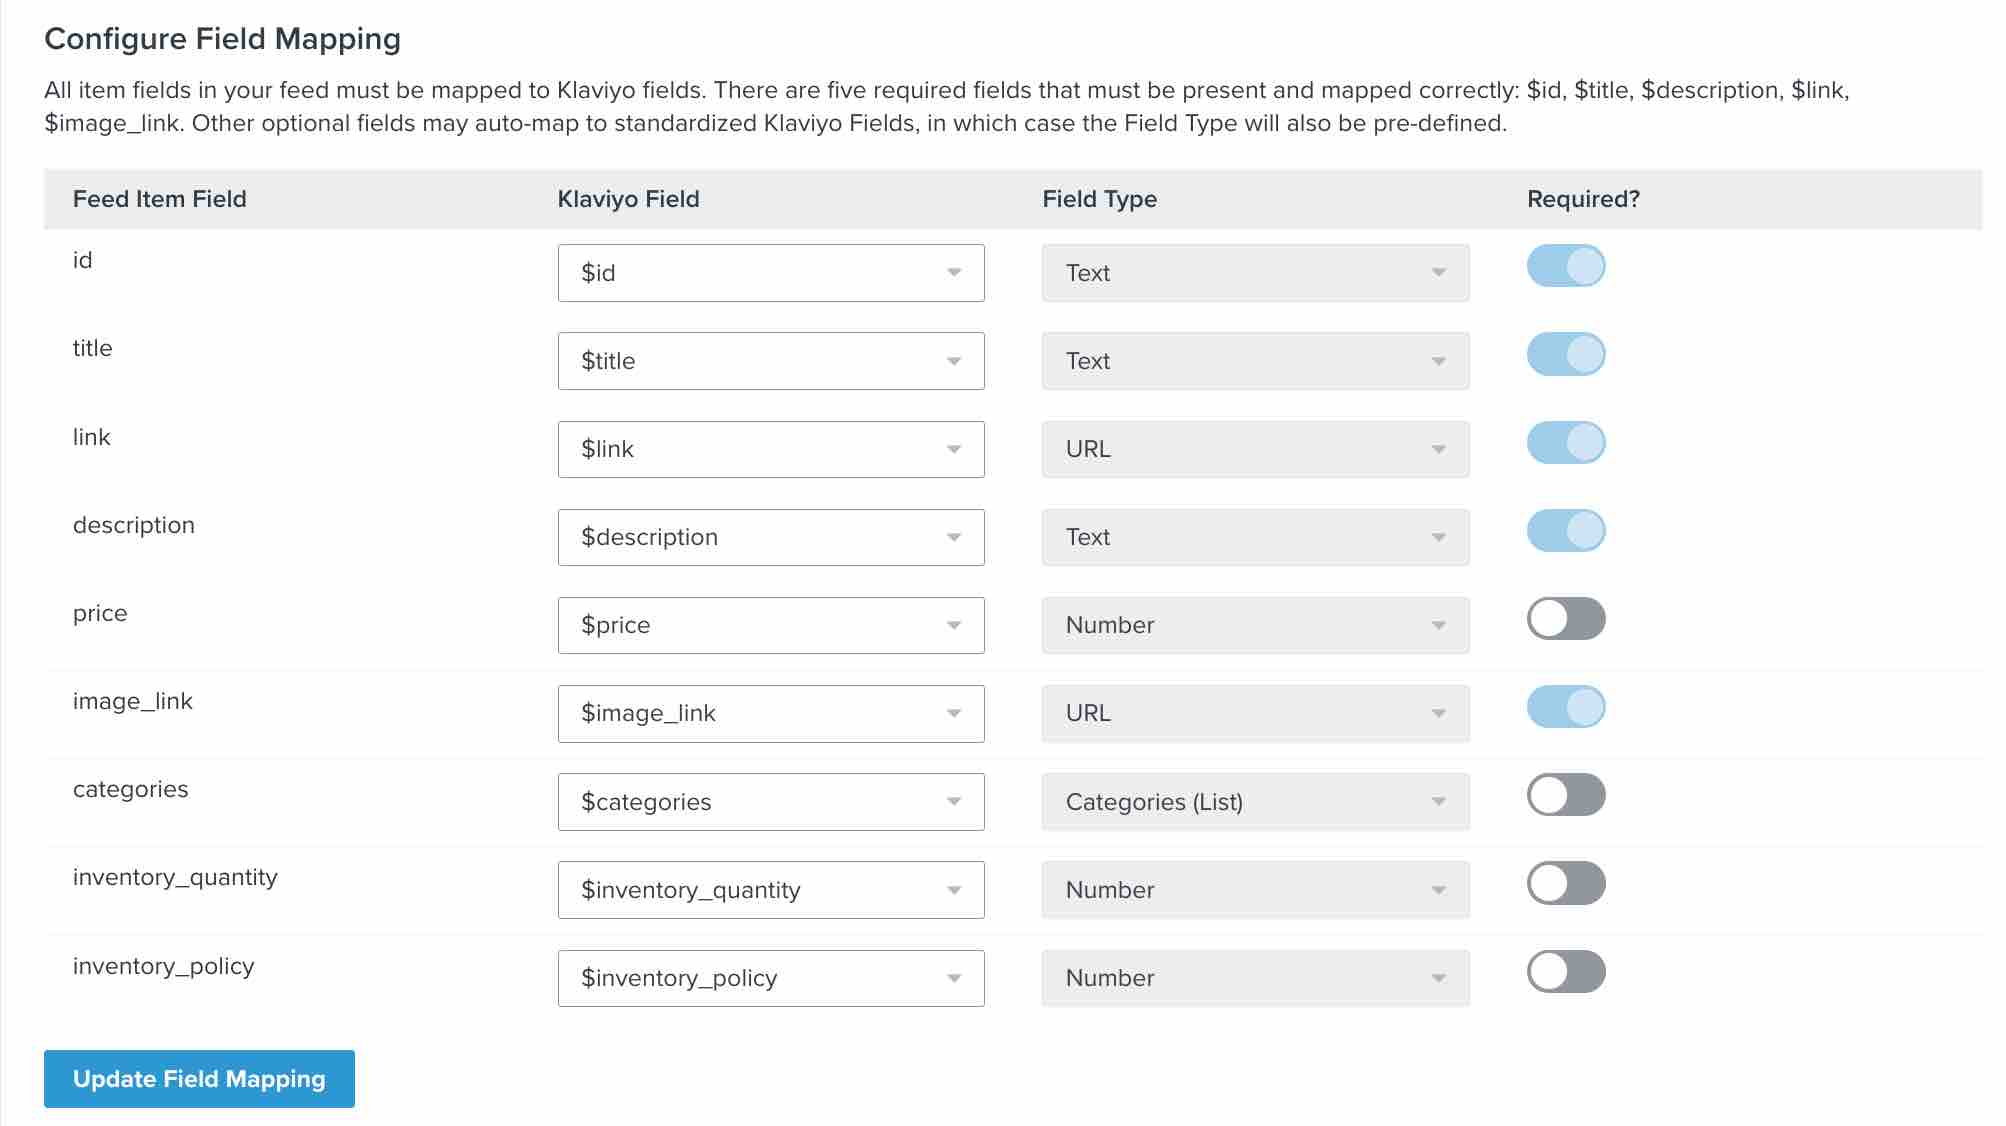
Toggle a field “on” in the Required column to tell Klaviyo to only sync items that include that designated field. This is auto-populated for fields required by Klaviyo and can be optionally toggled on for additional fields.
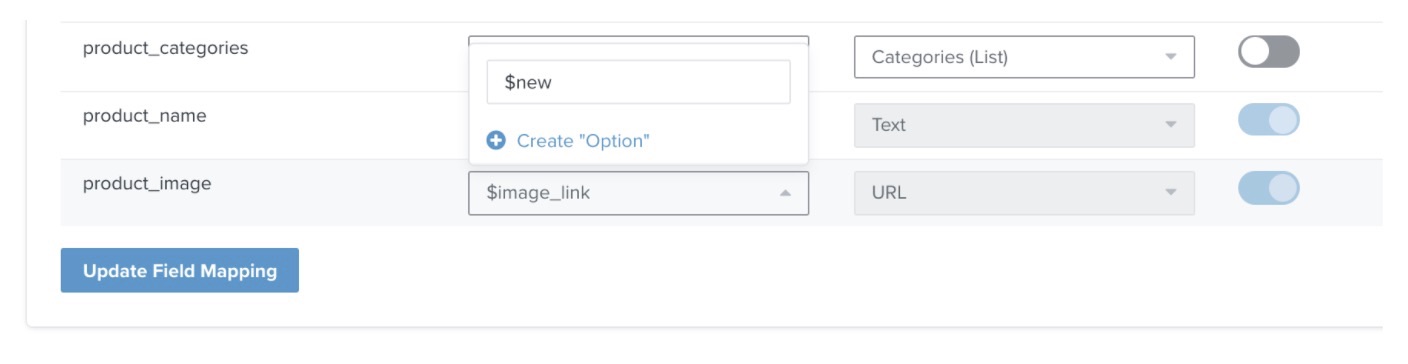
If your catalog has extra fields you would like to include, you can create a new field by typing the new field name into the Klaviyo Field column for that field and clicking Create “Option”.
Finalize your catalog
Once you’ve mapped the catalog feed in your account, the last step in the setup process is to reach out to our Support Team with the following information:
-
The name of the metric (or metrics) in your account you would like to use for product recommendations. These metrics can be Ordered Product, Viewed Product given that you’re tracking those events in your account, or any custom metric sent via API.
- If you’ve set up an Added to Cart event, Klaviyo will automatically configure it for use in product feeds based on Products a customer has added to cart.
- You can request as many metrics as you like to be configured for use in personalized recommendations, though each metric must be leveraged in its own feed.
- You cannot currently use metrics synced via a built-in Klaviyo ecommerce integration (for example, an Ordered Product metrics from Shopify) in conjunction with a custom catalog for product recommendations. Your Ordered Product event must be sent via API. Shopify Viewed Product and Added to Cart events are excluded from this rule because they are created via Klaviyo tracking. This ability will be added in a future release.
-
The name of the property in that metric’s metadata which corresponds to the Item ID ($id) used in your catalog feed (e.g., "ProductID").
Once this step is complete, you will be able to access and use the Product Feed and Product Block features.
Delete a source
- Deleting a catalog source will not delete the items in your catalog, it will only delete the connection between the source and Klaviyo, and no new updates will occur.
- If you are interested in deleting catalog items, please reach out to our Support Team.
If you want to delete a custom catalog feed source, such as a test source you are no longer using, navigate to Products > Manage Custom Catalog Sources and click the three dot dropdown next to the source to be deleted. Then, click Delete.
Additional resources
Updated about 16 hours ago