Klaviyo MCP server
Configure Klaviyo's MCP server to get AI assistance with your Klaviyo data.
You will learn
The Klaviyo Model Context Protocol (MCP) server seamlessly integrates with Klaviyo’s APIs, enabling AI clients to interact with your Klaviyo data. This guide will walk you through configuring various MCP clients for both the remote-hosted MCP server (recommended) and the local MCP server.
What is MCP?
MCP (Model Context Protocol) is an open protocol that helps AI models securely interface with different data sources and tools. You’ll connect Klaviyo’s MCP server to an MCP client, i.e., an AI agent like Claude or Cursor, to get assistance with your Klaviyo data. Your MCP client can help with a variety of tasks from campaign creation to flow performance reports. Here’s some examples of prompts you can give:
- “Show me the performance of my email campaigns from the last 30 days.”
- “Which flows are performing the best in terms of conversions?”
- “Create an email campaign promoting our Memorial Day sale.”
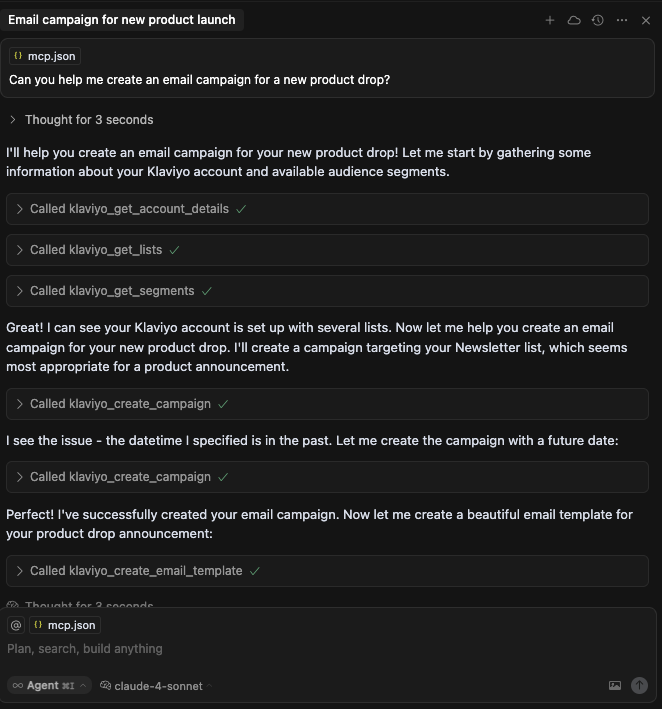
Here’s an example of an MCP client working on a Klaviyo-related task using Klaviyo’s MCP tools:
Configure your MCP client for the remote-hosted server (recommended)
This feature is only available to Klaviyo users with an Owner, Admin, or Manager role. Learn more about Klaviyo user roles.
By default, the remote-hosted server includes many tools. If your client has a smaller context window or you want to improve tool-selection accuracy, add the
core-tools-only=truequery parameter to limit the server to the ~40 core tools (see Query parameters).
To communicate with the Klaviyo MCP server, each MCP client needs specific configuration. Follow the steps below to get started:
- Log in to the Klaviyo account you'd like to use.
- Follow the steps below for the MCP client you’d like to configure.
Claude
Listed Connector (recommended for connecting to a single Klaviyo account)
The listed Klaviyo connector is the simplest way to access Klaviyo within Claude.
-
In Claude, navigate to Settings > Connectors.
-
Click Browse Connectors.
-
Search for Klaviyo and connect.
-
Review the Claude access and click Approve.
-
Review the permissions for your Klaviyo account and click Allow.
You're now ready to ask Claude about your Klaviyo data.
Custom Connector (recommended for connecting to several Klaviyo accounts)
This feature is only available to Claude and Claude Desktop for users on Pro, Max, Team, and Enterprise plans.
For each Klaviyo account you would like to add,
-
In Claude, navigate to Settings > Connectors.
-
Click Add custom connector.
-
Enter the following details in the connector modal:
a. Name: Klaviyo- If adding multiple accounts, include the name of the account you are connecting to distinguish it from others (e.g. "Klaviyo - Example Company")
b. Remote MCP server URL: https://mcp.klaviyo.com/mcp
- If adding multiple accounts, include the name of the account as a query parameter (e.g. "https://mcp.klaviyo.com/mcp?company=example-company")
e. Click Add.
-
Next to the connector, click Connect.
-
Review the Claude access and click Approve.
-
Review the permissions for your Klaviyo account and click Allow.
For each new chat, click + > Connectors and ensure that only the relevant connector is enabled.
ChatGPT
ChatGPT App (recommended for connecting to a single Klaviyo account)
The Klaviyo ChatGPT App is the simplest way to interact with your account data within ChatGPT. For detailed instructions, refer to how to use the Klaviyo app for ChatGPT.
ChatGPT Custom MCP Server (recommended for connecting to several Klaviyo accounts)
First,
-
In ChatGPT, navigate to Settings > Apps.
-
In Advanced settings, toggle Developer mode on.
For each Klaviyo account you would like to add,
-
Click Create app.
-
Enter the following details in the connector modal:
a. Name: Klaviyo- If adding multiple accounts, include the name of the account you are connecting to distinguish it from others (e.g. "Klaviyo - Example Company")
b. MCP Server URL: https://mcp.klaviyo.com/mcp
c. Authentication: Select OAuth
d. Select I understand and want to continue
e. Click Create. -
Review the ChatGPT access and click Approve.
-
If adding multiple accounts, choose the account you want to connect.
-
Review the permissions for your Klaviyo account and click Allow.
For each new chat, click + > More and select the correct server.
Cursor
-
Download Cursor.
-
Open Cursor. Within Settings > Cursor Settings > MCP > New MCP Server, add the following:
{
  "mcpServers": {
    "klaviyo": {
      "url": "https://mcp.klaviyo.com/mcp"
    }
  }
}
See Query parameters to choose any query parameters you'd like to add to control server behavior.
- Save your changes and navigate to Settings > Cursor Settings > Tools & Integrations. Click Needs login. You will be prompted to authenticate the server.
If you encounter authentication errors, first Logout of the MCP Server and reauthenticate. If that fails, sign out of your Cursor account and then sign back in.
- Verify the connection by looking for visual indicators and asking a question to test the connection.
VS Code
-
Download VS Code.
-
Open VS Code. Within MCP User Configuration (
Ctrl + Shift + P>MCP: Open User Configuration), add the following:
{
	"servers": {
		"klaviyo": {
			"url": "https://mcp.klaviyo.com/mcp"
		}
	}
}
If you already have a servers entry, append the Klaviyo configuration to it.
See Query parameters to choose any query parameters you'd like to add to control server behavior.
- Save your changes. From the command palette (Ctrl+Shift+P on Windows or Cmd+Shift+P on Mac), search for MCP: List Servers, then select klaviyo > Start Server. You will be prompted to authenticate the server.
The remote MCP server connection can sometimes take time to fully initialize and load all available tools. If the server fails to start or your initial test query does not work, you may need to restart VS Code a few times for the connection to fully register.
- Verify the connection by looking for visual indicators and asking a question to test the connection.
To enable only the tools that do not modify any Klaviyo data, add the query parameter
read-only=trueto the URL in your MCP client’s configuration file.
Other Clients
Our server is compatible with any MCP client that supports remote servers. You may need the following info when connecting:
- URL: https://mcp.klaviyo.com/mcp
- Authentication method: OAuth (with dynamic client registration)
- Transport: Streamable HTTP
Query parameters
You can control server behavior with query parameters.
Query parameters can't be controlled with the listed Claude connector or the listed ChatGPT app. To use them, set up a custom connector instead (see Custom Connector under Claude and ChatGPT Custom MCP Server under ChatGPT above).
| Parameter | Options | Default value | Description |
|---|---|---|---|
read-only | true, false | false | Setting this value to true disables any tools which can perform write actions on your Klaviyo account. |
disable-tools-with-user-generated-content | true, false | false | Disables specific tools that read user-generated content in your Klaviyo account that could be interpreted by your LLM (see Available tools). Be sure to carefully review each tool call to ensure your client is not acting on malicious instructions. |
core-tools-only | true, false | false (true for ChatGPT) | Setting this value to true limits the server to the ~40 core tools. This reduces the number of tools loaded into your client, which can help clients with smaller context windows and improve tool-selection accuracy. Defaults to true for ChatGPT clients. |
include-output-schemas | true, false | true (false for ChatGPT) | Controls whether output schemas are included in the tools list. Defaults to false for ChatGPT clients. |
beta | true, false | false | Setting this value to true enables access to new, potentially unstable tools. |
Here's an example of what your URL may look like:
https://mcp.klaviyo.com/mcp?read-only=true&disable-tools-with-user-generated-content=true&core-tools-only=true
Configure your MCP client for the local server
To use the local MCP server, you’ll need:
- uv
- A compatible MCP client (e.g., Cursor). For web-based clients such as ChatGPT, use our remote-hosted server.
To communicate with the Klaviyo MCP server, each MCP client needs specific configuration. Follow the steps below to get started:
- To utilize all available tools, create a Klaviyo private API key with the following permissions:
| Scope | Access |
|---|---|
| Accounts | Read |
| Campaigns | Full |
| Catalogs | Read |
| Events | Full |
| Flows | Read |
| Images | Full |
| List | Read |
| Metrics | Read |
| Profiles | Full |
| Segments | Full |
| Subscriptions | Full |
| Tags | Read |
| Templates | Full |
| Translations | Full |
- Follow the steps below for the MCP client you’d like to configure.
You can add multiple Klaviyo accounts to your MCP client's configuration file to switch between accounts without editing the file each time. Just be sure to reference the desired account in each prompt.
Claude Desktop
-
Download Claude Desktop.
-
Open Claude Desktop. Within Settings > Developer > Edit Config, add the following, substituting your API key:
{
 "mcpServers": {
   "klaviyo": {
     "command": "uvx",
     "args": ["klaviyo-mcp-server@latest"],
     "env": {
       "PRIVATE_API_KEY": "YOUR_API_KEY",
       "READ_ONLY": "false",
       "ALLOW_USER_GENERATED_CONTENT": "false"
     }
   }
 }
}
-
Once you have saved all configuration changes, terminate all Claude processes and relaunch Claude to apply the new settings.
-
Verify the connection by looking for visual indicators and asking a question to test the connection.
If you get errors upon starting Claude, you may need to provide the full path to the
uvxexecutable for thecommandkey. On macOS, find this by runningwhich uvx.
- (Recommended for security) To avoid storing your API key in plaintext, save your API key in your password manager. Then, use the following command to launch Claude, pasting in your API key when prompted:
uvx --from klaviyo-mcp-server@latest run-claude
Note that as of now, this only supports MacOS and Windows.
Note for free users
The free version of Claude Desktop has a very limited context window, and you may run into issues with all the tools enabled. Here are a few possible workarounds:
- Only enable the tools you need. To do this, click the Search and tools button near the prompt. Then, click klaviyo to toggle certain tools on or off.
- Use read-only mode, i.e., set
READ_ONLYto true.- Use a different client.
Cursor
-
Download Cursor.
-
Open Cursor. Within Settings > Cursor Settings > Tools & Integrations > Add Custom MCP, add the following, substituting your API key:
{
  "mcpServers": {
    "klaviyo": {
      "command": "uvx",
      "args": ["klaviyo-mcp-server@latest"],
      "env": {
        "PRIVATE_API_KEY": "YOUR_API_KEY",
        "READ_ONLY": "false",
        "ALLOW_USER_GENERATED_CONTENT": "false"
      }
    }
  }
}
-
Once you have saved all configuration changes, terminate all Cursor processes and relaunch Cursor to apply the new settings.
-
Verify the connection by looking for visual indicators and asking a question to test the connection.
-
(Recommended for security) To avoid storing your API key in plaintext, save your API key in your password manager. Then, use the following command to launch Cursor, pasting in your API key when prompted:
uvx --from klaviyo-mcp-server@latest run-cursor
Note that as of now, this only supports MacOS and Windows.
VS Code
-
Download VS Code.
-
Open VS Code. Within settings (
Ctrl + Shift + P>Preferences: Open Settings (JSON)), add the following:
{
  "mcp": {
    "servers": {
      "klaviyo": {
        "command": "uvx",
        "args": ["klaviyo-mcp-server@latest"],
        "env": {
          "PRIVATE_API_KEY": "${input:klaviyo_api_key}",
          "READ_ONLY": "false",
          "ALLOW_USER_GENERATED_CONTENT": "false"
        }
      }
    },
    "inputs": [
      {
        "type": "promptString",
        "id": "klaviyo_api_key",
        "description": "Klaviyo API Key",
        "password": true
      }
    ]
  }
}
-
Once you have saved all configuration changes, terminate all VS Code processes and relaunch VS Code to apply the new settings.
-
Verify the connection by looking for visual indicators and asking a question to test the connection.
To enable only the tools that do not modify any Klaviyo data, set the
READ_ONLYenvironment variable to true in your MCP client’s configuration file.
Environment configuration
The Klaviyo MCP server provides some configuration options which can be controlled with environment variables.
| env | Options | Default value | Description |
|---|---|---|---|
READ_ONLY | true, false | false | Setting this value to true disables any tools which can perform write actions on your Klaviyo account. |
ALLOW_USER_GENERATED_CONTENT | true, false | true | Setting this value to false disables specific tools from reading and interpreting user-generated content in your Klaviyo account using your LLM (see Available tools). If left as true, be sure to carefully review each tool call to ensure your client is not acting on malicious instructions. |
Add multiple accounts to your configuration file
To avoid editing your MCP client's configuration file each time you switch Klaviyo accounts, you can add multiple accounts to the file.
To do this:
- Copy and paste the same configuration shown above for each account you want to add.
- Update the name, i.e.,
klaviyo, to something more descriptive for each account, and replace the API keys accordingly.
Your config file should look like this:
{
  "mcpServers": {
    "klaviyo_company1": {
      "command": "uvx",
      "args": ["klaviyo-mcp-server@latest"],
      "env": {
        "PRIVATE_API_KEY": "YOUR_API_KEY_1",
        "READ_ONLY": "false",
        "ALLOW_USER_GENERATED_CONTENT": "false"
      }
    },
    "klaviyo_company2": {
      "command": "uvx",
      "args": ["klaviyo-mcp-server@latest"],
      "env": {
        "PRIVATE_API_KEY": "YOUR_API_KEY_2",
        "READ_ONLY": "false",
        "ALLOW_USER_GENERATED_CONTENT": "false"
      }
    }
  }
}
Troubleshooting
If you are having trouble connecting to the remote server:
- Ensure the URL is correct and there is no trailing slash:
https://mcp.klaviyo.com/mcp. - Ensure you have the Owner, Admin, or Manager role on the Klaviyo account.
If your MCP client can’t find enabled MCP tools for Klaviyo:
- Review the steps above and ensure the MCP server is configured correctly.
- Terminate all processes and relaunch the app to refresh your client.
If you’re getting inaccurate or inconsistent responses:
- Start a new chat to reset the conversation context.
- Be specific in your queries by providing necessary, relevant keywords.
Available tools
| Category | Tool name | Description | Read Only | Has User Generated Content | Available on Remote Server |
|---|---|---|---|---|---|
| Accounts | get_account_details | Get details of your account. | ✅ | ✅ | |
| Campaigns | get_campaigns | List your campaigns. | ✅ | ✅ | |
| Campaigns | get_campaign | Get details of a campaign. | ✅ | ✅ | |
| Campaigns | create_campaign | Create a campaign. | ✅ | ||
| Campaigns | assign_template_to_campaign_message | Assign an email template to a campaign message. | ✅ | ||
| Catalogs | get_catalog_items | List your catalog items. | ✅ | ✅ | |
| Events | get_events | List events. | ✅ | ✅ | ✅ |
| Events | create_event | Create an event for a profile. | |||
| Events | get_metrics | List event metrics. | ✅ | ✅ | |
| Events | get_metric | Get details of an event metric. | ✅ | ✅ | |
| Events | query_metric_aggregates | Query and aggregate event data associated with a metric. | ✅ | ✅ | |
| Flows | get_flows | List your flows. | ✅ | ✅ | |
| Flows | get_flow | Get details of a flow. | ✅ | ✅ | |
| Groups | get_lists | List your lists. | ✅ | ✅ | |
| Groups | get_list | Get details of a list. | ✅ | ✅ | |
| Groups | get_segments | List your segments. | ✅ | ✅ | |
| Groups | get_segment | Get details of a segment. | ✅ | ✅ | |
| Images | upload_image_from_file | Upload image from a local file. | |||
| Images | upload_image_from_url | Upload image from a URL. | ✅ | ||
| Profiles | get_profiles | List your profiles. | ✅ | ✅ | ✅ |
| Profiles | get_profile | Get details of a profile. | ✅ | ✅ | ✅ |
| Profiles | create_profile | Create a profile. | ✅ | ||
| Profiles | update_profile | Update a profile. | ✅ | ✅ | |
| Profiles | subscribe_profile_to_marketing | Subscribe a profile to marketing for a given channel and list. | ✅ | ||
| Profiles | unsubscribe_profile_from_marketing | Unsubscribe a profile from marketing for a given channel and list. | ✅ | ||
| Reporting | get_campaign_report | Get a report of your campaign performance. | ✅ | ✅ | |
| Reporting | get_flow_report | Get a report of your flow performance. | ✅ | ✅ | |
| Templates | create_email_template | Create an HTML email template. | ✅ | ||
| Templates | get_email_template | Get the details of an email template. | ✅ | ✅ | |
| Templates | create_dnd_email_template | Create a drag-and-drop (DND) email template with a structured definition. | ✅ | ||
| Templates | update_dnd_email_template | Update an existing drag-and-drop (DND) email template. | ✅ | ||
| Templates | list_email_templates | List your email templates. | ✅ | ✅ | |
| Templates | update_email_template | Update an HTML email template. | ✅ | ||
| Templates | clone_email_template | Clone an email template. | ✅ | ||
| Templates | delete_email_template | Delete an email template. | ✅ | ||
| Templates | render_email_template | Render an email template with provided context. | ✅ | ✅ | |
| Translations | get_translations | List all translation collections. Supports filtering by channel, resource type, and resource ID. (Beta) | ✅ | ✅ | |
| Translations | get_translation | Get a translation collection by ID, optionally including translated values per locale. (Beta) | ✅ | ✅ | |
| Translations | create_translation | Create a translation collection for a campaign variation, flow message, template, or universal content. (Beta) | ✅ | ||
| Translations | update_translation | Update translation settings (locales) and/or import translated values for a resource. (Beta) | ✅ | ||
| Translations | delete_translation | Delete a translation collection and all its localized values. (Beta) | ✅ |
Updated about 1 month ago